
Project Templates
Imagine starting a new project and instantly having access to a tailored blueprint designed to kickstart your workflow efficiently. With Templating.app’s new Project Template feature, this becomes a reality. Our innovative solution empowers users to streamline their project initiation process, saving time and ensuring consistency across all their endeavors.
Key Benefits
Scalability: As your organization grows and undertakes increasingly diverse projects, the scalability of your tools becomes paramount. Templating.app’s Project Templates can scale alongside your business, adapting to evolving project needs and ensuring continued efficiency and effectiveness.
In today’s fast-paced world, efficiency and consistency are key to staying ahead of the curve. With Templating.app’s Project Templates feature, users can unlock a new level of productivity by streamlining project initiation, maintaining standards, and fostering collaboration. Say goodbye to wasted time and hello to streamlined workflows with Templating.app!
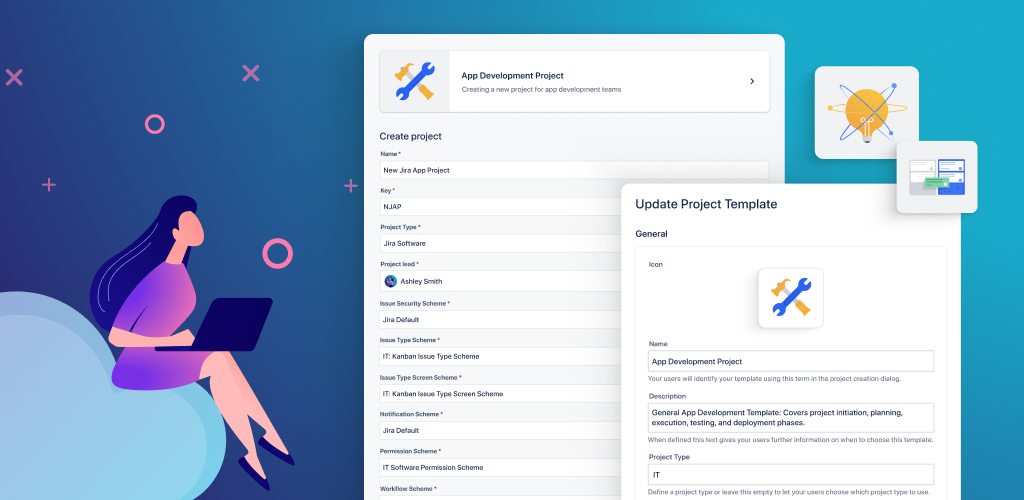
Create Project Template
To create a new project template in Templating.app as a Jira administrator, you have two methods available:
Method 1
- Navigate to Jira Administration: From the top navigation menu, click on „Administration.“
- Access Templating.app: In the Administration menu, locate and select „Apps.“
- Choose Templating.app: Look for Templating.app in the list of installed apps and click on it.
- Navigate to Templates: Within the Templating.app interface, locate and click on „Templates.“
- Create Template: Find the option to „Create template“ and click on it.
Method 2
- Open „Apps“ at the Top-Level Navigation: From the top-level navigation menu, click on „Apps.“
- Select Templating.app: Look for Templating.app in the list of available apps and click on it.
- Access Project Templates: Within the Templating.app interface, locate and click on „Project Templates.“
- Navigate to Administration: Look for a blue panel within the Project Templates interface. This panel should include a link to the administration section. Click on it.
- Create Template: You will be directed to the administration section where you can create a new template.
Configure Project Template
- Field Configuration Schemes
- Issue Security Schemes
- Issue Type Schemes
- Issue Type Screen Schemes
- Notification Schemes
- Permission Schemes
- Workflow Schemes
- Within each scheme, administrators can select specific options to include in the template or leave them empty.
- Leaving options empty allows users to decide which option to use during project creation.
- If only one option is chosen for a scheme, it will be automatically applied to the project without user selection.
- If multiple options are chosen for a scheme, users will be presented with a selection to choose from during project creation.
Define Permissions
Access Project Template Permissions:
- Open the app configuration of Templating.app
- Find and click on the „Permissions“ option.
- From the select fields, designate users or groups permitted to create projects.
- After selecting users/groups, click „Save“ to apply changes.
Customize Project Templates
Apply Project Template
- Start by giving the new project a name.
- Optionally, you can change the project key provided.
- Based on the template configuration set by an administrator, you may have options to configure the project setup.
- If allowed by the administrator, select the project type and project lead.
- Choose different scheme types if applicable.
Configure Project Templates for Agile Hive
Fast & Easy Project Creation for Agile Hive Cloud
Save time & effort for admins: Admins can create individual Jira project templates based on available schemes. After setup, it only takes a few clicks to kickstart a project for any use case.
Reduce bottlenecks in Jira workflows: Specify permissions for non-admin users or groups, enabling your employees to create their own projects quickly.
Maintain consistency & reduce errors across projects: Pre-defined schemes will maintain coherence across projects and avoid disarray due to any custom project setup by teams.
Possible Project Templates
Agile Hive Scheme Types
Agile Hive Portfolio Template
Agile Hive – Portfolio – Issue Type Scheme
Agile Hive – Portfolio – Issue Type Screen Scheme
Agile Hive – Portfolio – Workflow Scheme
Agile Hive Large Solution Template
Agile Hive – Solution Train – Issue Type Scheme
Agile Hive – Large Solution – Issue Type Screen Scheme
Agile Hive – Solution Train – Workflow Scheme
Agile Hive Art Template
Agile Hive – ART – Issue Type Scheme
Agile Hive – ART – Issue Type Screen Scheme
Agile Hive – ART – Workflow Scheme
Agile Hive Team Template
Agile Hive – Team – Issue Type Scheme
Agile Hive – Team – Issue Type Screen Scheme
Agile Hive – Team – Workflow Scheme
Written description: Configure Agile Hive ART Project Template
You will find the Templating.app in the Atlassian Marketplace. Make sure that you are an administrator. If you have admin access in your Jira instance, you are ready and set for your first project template.
Navigate to Apps and click on Templating.app.
Access Project Templates: In the top right of the navigation, you can click on “Project Templates.” If you do not have this option displayed, you are probably missing admin access.
Access Administration: Now you can see all project templates that are available at the time. In the top left, you can go to administration and edit templates or create a new one.
Creating a template with Agile Hive Cloud schemes: In the setup, you can add various information like Name, Description, Notes, Project Type, and Project Lead. Also, choose if the project template will be enabled or disabled.
Define available scheme types: You can pre-define which schemes should be available for a user that will use the template afterward:
For Agile Hive Cloud, you always have the schemes available for every SAFe hierarchy:
Agile Hive – ART – Issue Type Scheme
Agile Hive – ART – Issue Type Screen Scheme
Agile Hive – ART – Workflow Scheme
→ When there is no specific scheme that applies to your use case, you can always choose the “Jira Default.” If you do not choose one of the schemes, all of them will be available to the person creating a Jira project afterward.
After choosing all relevant options for your template, you can simply go back into the user interface and create your first Agile Hive template!
Define Permissions: Navigate to Permissions in the left menu. Here you can add specific groups or specific users that will be able to use the project template.
Create a project: Next, you can navigate back to the Project Template overview, choose a preferred template, and create your project with just a few clicks. Since all scheme types are already defined, you will only need to choose the name and key for your project.
Create a Kanban board: After your project is created, you can navigate to “Boards” on the left, then “Create a Board” and choose Kanban Board. Now you can “Create a board from an existing project” and choose your Agile Hive ART Project.
Voila! You’re done! 🥳
Save time on repetitive tasks in Jira
Templating.app is your all-in-one Jira project management tool for custom Jira Issue templates, subtask templates & project templates